Total Pageviews

Showing posts with label gluten free. Show all posts

Wednesday, August 24, 2011

Mediterranean Night

One of my favorite restaurants here is a Mediterranean restaurant down the street.   They have a vegetarian platter that I love.   It comes with hummus, falafel, lentils and rice, and tabouli.   Although I love the dish I also realize that it is LOADED with fat.  I only eat there a couple of times a year and I have come up with recipes to make it at home without all the fat.

 
We have hummus a lot.  It is high protein, rich in fiber, and delicious.   Most commercial brands have a lot of added fat.  It isn't necessary to add all that fat to get a wonderful, creamy hummus.   There are a lot of ways to use hummus.   You can use it for a sandwich filling or as a spread to replace mayonnaise.   The most common way to use it is to put a big spoonful of it on pita bread, throw a falafel or two on top and add a little hot sauce.  Falafel is very close to hummus but it is normally deep fried.   I bake it instead and it is great.   Leaving out the oil and baking it makes it a bit drier than the fried variety but once you have the hummus on top of it the moisture takes care of that.  Garbanzo and chickpeas are the same thing.   I use them interchangeably.

The lentils and rice were always the trickiest part of the dish - I tried tons of recipes and could never figure out how to get that distinctive taste.   I finally nailed it and it is just as good.   This post is going to be 3 different recipes.   I make the rice and lentils a day ahead so can just throw everything together when I get home from work.  It is a work intensive meal but it is worth it.

Mediterranean Lentils and Rice

  • 3-4 onion, chopped
  • 2 tablespoons soy sauce
  • 2 teaspoons ground cumin
  • 1 teaspoon ground cardamom
  • 2 teaspoons garlic powder
  • 1/2 teaspoon cayenne, or to taste
  • 1 teaspoon salt
  • 1 cup brown lentils
  • 2 cups vegetable broth
Add ½ cup water, salt, and soy sauce to a wide skillet. Add onion and cook until almost all the water evaporates; continue adding water a few tablespoons at a time and onions are browned (caramelized) – this can take 10-15 minutes.  You want to let the water almost completely evaporate before adding more, there will be bits of brown sticking to the pan and you want the pan to be hot enough for the water to boil up and release the brown bits, this is called deglazing the pan.    Add cumin, cardamom, garlic, and cayenne and cook for 3 minutes.
 Add lentils and broth or water and bring to a boil. Cover, reduce heat to low and simmer for 40 minutes.

Cook the brown rice separately.  

Fluffy Brown Rice

1 cups brown rice
5 cups water
salt – to taste

Rinse the rice in a colander under cold running water for a few seconds. Add the water to a large pot and bring to a boil over high heat.  Once the water begins to boil, add the rice and stir once.  Reduce the heat to medium and boil, uncovered, for 30 minutes, stirring occasionally.  After 30 minutes, pour the rice into a colander and drain for about 10 seconds over the sink.  Return the rice to the pot, (make sure to remove the pot from the heat). Cover the pot with a tight-fitting lid and set it aside to allow the rice to steam for 10 minutes.  After you have steamed the rice for 10 minutes, uncover rice, fluff with a fork, and season with salt to taste.

Once rice is done, add the lentils and stir to combine.

 
Baked Falafel
1 15 ounce can garbanzo beans, with liquid reserved
1 small onion, finely chopped
2-3 garlic cloves, finely chopped
2 tablespoons dried parsley, chopped
1 teaspoon coriander
1 teaspoon cumin
1/2 teaspoon dried red pepper flakes
2 tablespoons garbanzo flour (substitute regular flour if you are not avoiding gluten)
1 teaspoon baking powder
Salt and pepper to taste

Preheat oven to 375 degrees. Drain and rinse the garbanzo beans.  Put in a medium sized bowl and smash with a fork (or pulse a few times in a food processor). Add the rest of the ingredients and mix well. Form into small balls, about the size of an ice cream scoop and slightly flatten (the flatter they are the more uniformly they will cook. Place onto an oiled baking pan.
Bake for 15 minutes on each side, until nicely browned (since it’s baked; only the part actually touching the pan will be browned and crispy).

Low Fat Hummus

2 cans chickpeas (liquid reserved)
2 teaspoons garlic powder
 2 teaspoons onion powder
1 tablespoons tahini
2 tablespoons lemon juice
¼ teaspoon salt
1 teaspoon paprika
1 teaspoon cumin
¼ teaspoon cayenne


Place all ingredients into a food processor and process, adding very small amounts of the reserved bean liquid at a time.   You want it to be totally smooth with no remaining chunks of chickpeas in it.  It won’t take very much of the reserved liquid to accomplish this.   Using plain water doesn’t give it the same creamy texture as the reserved bean liquid does.  

Thursday, August 18, 2011

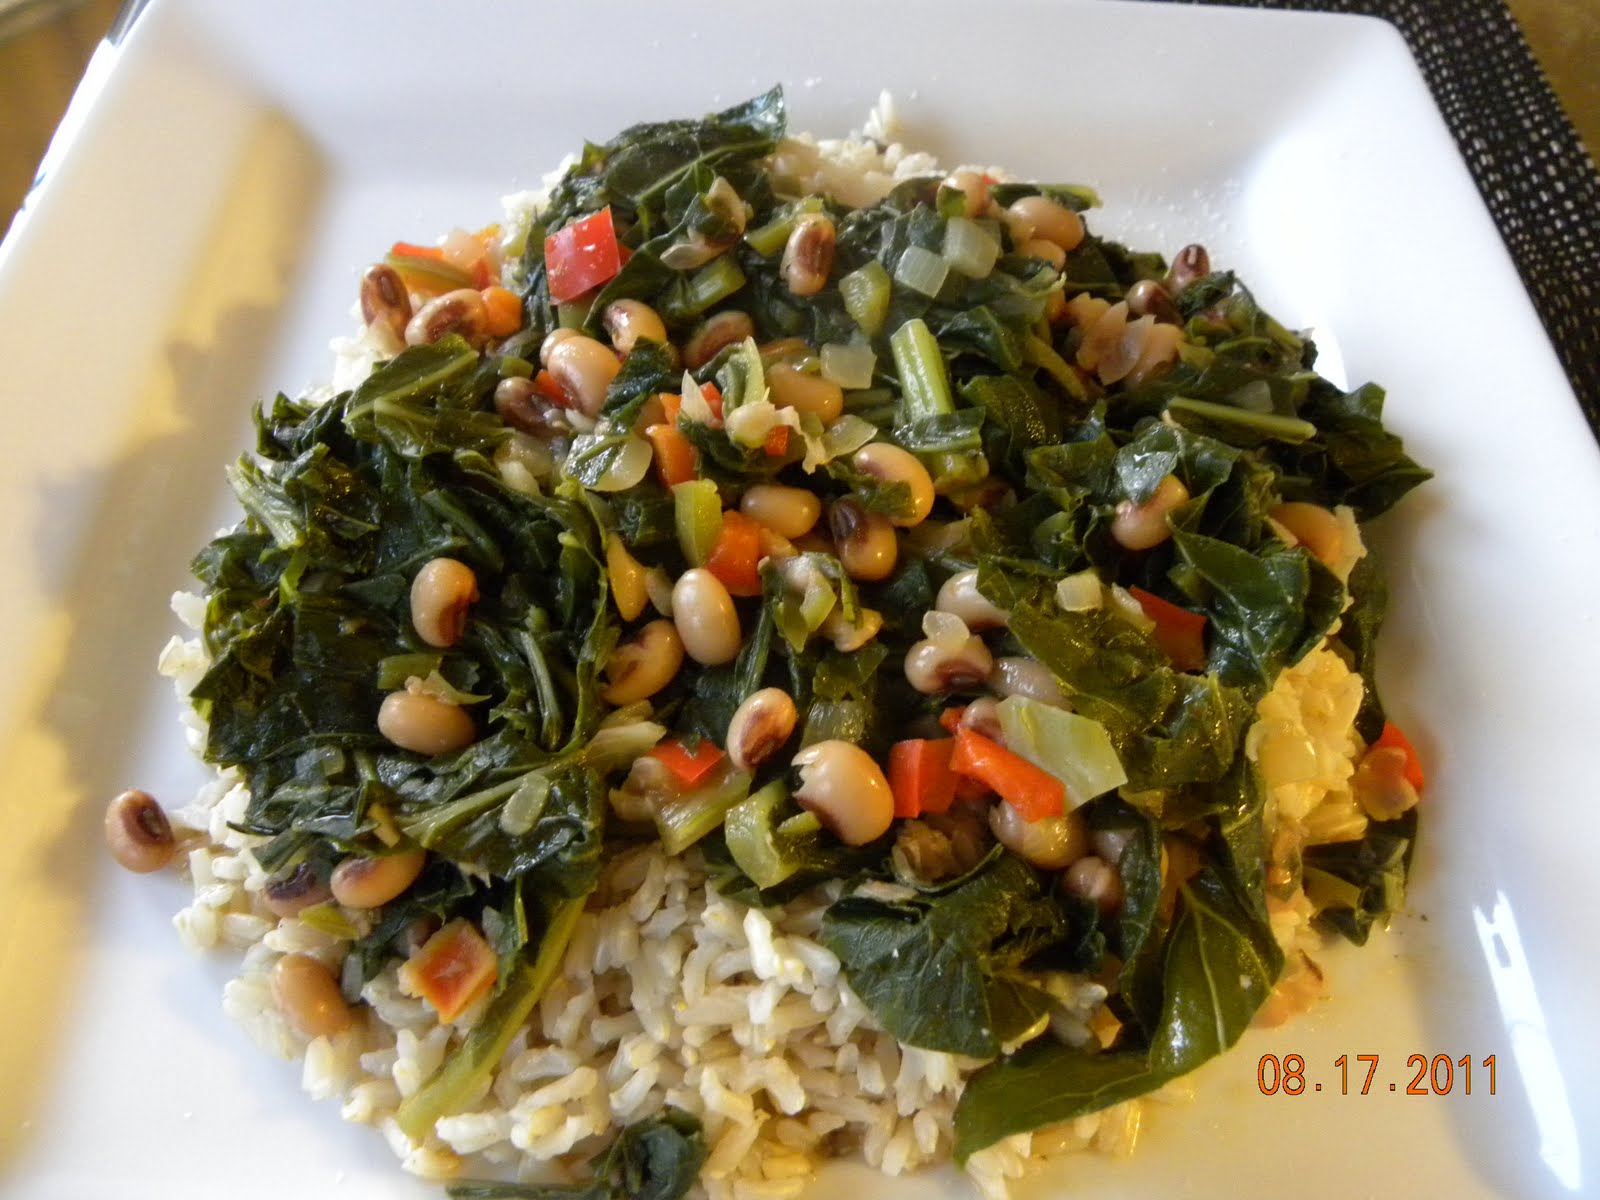
Hoppin' John with Perfect Brown Rice


I love Hoppin' John.   Black-eyed peas, collard greens, and plenty of peppers and onions - it just doesn't get much better than that.   My husband is from New York and I don't think he ever tried collard greens until he met me; I told him last night that I think it is illegal to have black-eyed peas in the South without collard greens.   If it isn't illegal it should be.  I serve this over brown rice to make it a complete meal.

I've been making brown rice for many, many years.   I don't like white rice and I never really have.   The only time we ever eat it is in restaurants.   White rice is bleached and all the fiber is stripped out of it.   All the wonderful benefits of eating the whole grain are lost with white rice.   It also has a much higher glycemic index than brown rice.  Brown rice takes longer to cook but you should make a lot of it at once and store the extra in the refrigerator for another meal.   Brown rice and quinoa are staples in our diet and we eat them often.

Until a few months ago, I always prepared brown rice according to the package directions; it always turned out a bit too mushy.   I've discovered a new way of preparing it that leaves it fluffy and light and we prefer it this way.  This method also preserves more of the slightly nutty flavor that brown rice has.  This recipe is enough for more than one meal.


Fluffy Brown Rice

2 cups brown rice
10 cups water
salt – to taste

Rinse the rice in a colander under cold running water for a few seconds. Add the water to a large pot and bring to a boil over high heat.  Once the water begins to boil, add the rice and stir once.  Reduce the  heat to medium and boil, uncovered, for 30 minutes, stirring occasionally.  After 30 minutes, pour the rice into a colander and drain for about 10 seconds over the sink.  Return the rice to the pot, (make sure to remove the pot from the heat). Cover the pot with a tight-fitting lid and set it aside to allow the rice to steam for 10 minutes.  After you have steamed the rice for 10 minutes, uncover rice, fluff with a fork, and season with salt to taste.

Hoppin' John


2 cans of black-eyed peas, drained and rinsed
1 onion, chopped
4 cloves garlic, minced
3 jalapeño peppers, minced
1 or 2 bell peppers, chopped
dash of cayenne
1 teaspoon paprika
1 bunch of collard greens, roughly chopped
1 cube vegetable bouillon
1 teaspoon toasted sesame oil
1 teaspoon liquid smoke

Add ½ cup water to a sauté pan with 1 teaspoon toasted oil.   Add onion, bell peppers, jalapeño peppers, and garlic and sauté until onions are translucent.  Add beans, cayenne, paprika, and liquid smoke and continue to simmer, adding water as needed, while you cook the collard greens


To make the greens, wash them well and chop them up, set aside then add about 1 teaspoon of TOASTED sesame oil and about a tablespoon of hot sauce with water, bring to a boil and add a little salt.  Throw the greens in and cover, stirring them up occasionally until they are as tender as you want them, usually 5 to 10 minutes.

Toss the collard greens with the black eyed peas and serve over brown rice. 

Optional: Top with chopped tomatoes, onions, or peppers from the garden.

Wednesday, August 17, 2011

Low Fat Fettucine Alfredo

We haven't had a lot of luck with gluten free pastas until now.   I found a great one at Walmart this week and it is the closest to wheat pasta that we have ever had.  It makes great Pad Thai and fettucine alfredo and reheats well - most gluten free pastas taste like chalk when they are reheated.  This is the one I found:


I make fettucine alfredo when I am in a hurry or don't have a lot of time.   Last night we were very hungry so I threw this together in less than 30 minutes.   By the time the pasta was cooked the sauce was ready.  It tastes really rich and creamy with very little fat and calories.  It is comfort food and healthy at the same time.


Vegan Fettucine Alfredo

1 14-16 oz package of pasta
1/8 cup of cashews (preferably raw cashews - rinse if they are roasted)
1 cup of water
1 12-oz package Mori-Nu silken tofu
1/2 cup nutritional yeast
1/2 teaspoon garlic powder
1/2 teaspoon onion powder
1/4 teaspoon ground nutmeg
1/2 teaspoon salt
1 pound broccoli, steamed (optional)
1 small package of cherry or grape tomatoes, halved (optional)
a few sprigs of fresh parsley for garnish, roughly chopped (optional) 

Cook pasta according to package directions.  Drain.

Place the cashews and water in a blender and blend until it is smooth and "milky".   Crumble in the tofu and spices and blend until smooth and well combined.   Pour sauce into a small saucepan and heat through until it is thick and creamy (this should only take a minute).

Combine pasta with sauce and mix together.    Put the pasta on plates, top with broccoli, tomatoes, and parsley if using.  Serve warm.

Tuesday, August 16, 2011

Pad Thai

We have been eating out a lot lately because my husband has been out of town for a wedding.  I am back on track now and I am going to be making quick, easy, and inexpensive meals for awhile.  One of my favorite cookbooks is the Happy Herbivore cookbook.   It is full of easy recipes that don't cost a lot to make.   I use it a lot.   I have to make substitutions sometimes because we avoid gluten but they are simple substitutions.  Neither of us have Celiac disease or anything but we have both found that when we stop eating gluten we feel so much better - it was just an experiment at first but it made such a difference that we now avoid it all the time.

Last night I made Pad Thai.   This recipe is from the Happy Herbivore and it is wonderful.  I make the sauce alone sometimes and use it for dip or dressing.   It is the best peanut sauce I have ever made and it calls for 1 tablespoon of peanut butter - not the full 1/2 cup that most recipes call for.   I didn't take a picture of this dish last night because I already had one - if I make something more than once it means we loved it!

We may end up having a late night tomorrow night because we are doing a disaster recovery test for work and we never know how long it will take to complete the test.   Here is what I have planned for the rest of the week:

Gluten Free Fettucine Alfredo with broccoli and tomatoes

Hoppin' John with "Perfect" Brown Rice (this is a new way I have discovered to make brown rice and I will post the recipe)

Wild Rice and Mushroom Loaf with Cauliflower Mashed Potatoes and gravy


Thursday, August 11, 2011

Cheesy Spinach Enchiladas

My beautiful little niece spent the night with me on Saturday and I whipped her up some bean tostados.   They must have been kid friendly because she seemed to like them.


I seem to be on a Mexican kick this week - they had organic spinach on sale at the market and I bought a big clamshell of it and made these spinach enchiladas for dinner.   They are great - you can make the sauce I use in these alone and dip chips in it - it makes a delicious dip!

Cheesy Spinach Enchiladas

Ingredients

  • 1 pound fresh spinach, stems removed and well rinsed
  • 1 chopped yellow onions
  • 3/4 teaspoon salt
  • 12 corn tortillas
Sauce ingredients
   1 cup Nutritional yeast
  ¼ cup corn starch or arrowroot
   ½  teaspoon paprika
   2 teaspoons salt
   2 teaspoon ground cumin
   Dash garlic powder
   Dash chili powder
   2 cups water
   1 10-ounce cans tomatoes with green chiles
   1 ½  tablespoons prepared yellow mustard


Instructions

Preheat the oven to 350 degrees F.

Bring a large pot of salted water to a boil. In 3 batches, add the spinach and blanch for 15 seconds. Remove with a slotted spoon and shock in an ice bath. Remove and squeeze out the excess. Chop and set aside.

In a large saucepan, add the onions and enough water to cook, stirring, until very soft, 3 to 4 minutes. Add the spinach and stir to incorporate. Remove from the heat and adjust the seasoning, to taste.
In medium-large saucepan, combine flour, nutritional yeast, salt, paprika, cumin, chili powder, and garlic powder.  Add water and mix thoroughly.  Heat on medium heat and stir constantly; once thickened, remove from heat. Add in tomatoes and mustard and stir until a bit thicker.
Add about ½ of the sauce to the spinach mixture and stir to incorporate.
Heat tortilla by preferred method and place on a work surface. Place about 1/2 cup of the spinach mixture into the center of each tortilla and roll up into a cylinder. Place, seam side down, in a single layer across the bottom of a 9 by 13-inch casserole dish.


Pour remaining cheese sauce over the filled enchiladas and bake for 30-45 minutes.


Serve with Refried Beans and Mexican Rice.

Yield: 6 servings


Cosmic Cashew Kale with Confetti Quinoa

I've grown to love quinoa more and more over the past few years.   It is really easy to digest and loaded with protein.   This dish is from Susan V. over at Fat Free Vegan Kitchen and has been featured all over the web.   It isn't as low fat as most of the dishes I cook because the sauce is cashew based but it is rich, creamy and delicious!   The quinoa cooks up in 15 minutes so it is a great dish to make when you are short on time but needing some comfort food.   I came up with another variation on the sauce that makes it almost completely fat free.   It is not quite as good but almost!

Here is the original recipe:
http://blog.fatfreevegan.com/2011/05/cosmic-cashew-kale-and-chickpeas-with-confetti-quinoa.html

Here is my reduced fat version:
I make the quinoa just as directed in Susan's recipe:

Confetti Quinoa

Ingredients

  • 1 cup quinoa, rinsed very well
  • 1 clove garlic, minced or pressed
  • 2 cups hot vegetable broth
  • 1/4 red bell pepper, finely chopped
  • 2 green onions, green parts only, thinly sliced

Instructions

  1. In a medium-sized saucepan, toast the damp quinoa for a few minutes until it begins to dry out. Add all remaining ingredients EXCEPT the green onions, cover, and cook on low until all the liquid is absorbed and quinoa is fluffy. Stir in the green onions and serve hot.
I do the Kale and Chickpeas a little differently:

Cosmic Cashew Kale and Chickpeas

Ingredients

  • 1 package Mori-Nu light tofu
  • 1 cup non-dairy milk
  • 1/4 teaspoon garlic powder
  • 1/4 teaspoon onion powder
  • 1/2 cup nutritional yeast
  • 1 teaspoon vegetable bouillon or broth powder
  • 1 large onion
  • 1/2 red bell pepper
  • 1 1/2 cups chickpeas (or one 15-ounce can, rinsed and drained)
  • 1 bunch kale, central stems removed and leaves thinly sliced
  • 1 teaspoon dried oregano
  • Salt to taste
  • Freshly ground black pepper, to taste
  • Hot sauce, to taste
  • 2 to 4 tablespoons fresh basil, minced

Instructions

  1. Crumble the tofu, milk, garlic powder, onion powder, bouillion cube, and nutritional yeast into a blender.  Blend at highest speed until completely smooth and creamy. Set aside until needed.
  2. In a large non-stick skillet, cook the onion in a little water until it begins to brown, about 5-7 minutes. Add the red bell pepper and cook for another minute. Add the chickpeas, kale, and two tablespoons water. Cover immediately and reduce heat to medium. Cook, stirring often, until kale is tender, about 5 minutes.
  3. Add the reserved cream sauce, oregano, and salt, black pepper, and hot sauce to taste. Cook, stirring, until sauce thickens. If sauce becomes too thick, add a little water to thin. Add the fresh basil just before serving over Confetti Quinoa.

Making Tofu


Tofu is very strange to some people but I love the stuff!   I could eat it every day.  The problem is that most people don’t really know how to cook it.   It took me a long time to really figure it out.   There is a technique that must be followed to make it really good.   I used to buy it and try to eat it after opening the tub, draining the water out and briefly sautéing it in with my stir fries or whatever I was cooking.  Yuck!   It tasted like rubber and I couldn’t stand it.   

If I wasn’t brave and ordered it in vegetarian restaurants and got it off the food bar in health food stores I would probably still dislike it.   When I got it there it was delicious and chewy and had an entirely different texture.  The reason mine was so awful was that I didn’t know how to prepare it!  

Let me start this by saying that you should ALWAYS buy organic tofu.   Soybeans are one of the big GMO crops , like corn, and you shouldn’t take a chance with your health buying non-organic tofu.  Now that I have that rant out of the way I will tell you how to prepare it.

The easiest way to do it is to buy the tub of tofu, take it home and put it straight in the freezer.    Wait until it is frozen solid and take it out, put in the refrigerator, and let it thaw.  Give it a couple of days to thaw completely.  I try to keep a rotation going with it so there is always some in the freezer and some in the refrigerator, thawed and ready when I need it.  

Once it has thawed, you need to press it.  Put the whole block of tofu between a bunch of paper towels and put something flat like a baking sheet on top.   Start putting heavy objects on top of the baking sheet, cast iron skillet, canned goods, whatever you have to put some weight on it.   Let it drain for about 30 minutes.

I used this method for a long time but decided that it used too many paper towels, the cans would occasionally fall off and dent my floor, and it was always sitting in the way on my countertop while I was trying to prepare the rest of the meal.   I ordered two TofuXpresses from Amazon and I use those.  They are pretty expensive but I have used them so much that it has been well worth the expense.   I wouldn’t recommend anyone buying them if you don’t eat a lot of tofu or if you are not sure if you like them or not.  Here is what they look like and where to get them:


Once it has drained, cut the tofu into the desired size and prepare it according to your recipe.   My favorite way to make it is to “bread” it with nutritional yeast and bake it.

Baked Tofu

1 block of extra-firm tofu
½ cup nutritional yeast
½ teaspoon salt
½ teaspoon garlic powder
½ teaspoon black pepper


Preheat the oven to 400.

Spray a baking sheet lightly with non-stick spray.

Cut the pressed tofu block in half width-wise, then cut into 9 even blocks like this:

This will yield 18 pieces.

Place the nutritional yeast, salt, garlic powder , and black pepper into a gallon size ziplock bag and shake it up to mix all the ingredients well.   Add the separated tofu pieces to the bag and shake it up very well to coat all the tofu pieces.  

Place the tofu on the baking sheet – don’t let them pieces touch each other.  Bake for 20 minutes, remove from the oven and turn them over and bake for 20 more minutes.  I LOVE it cooked this way and use it in a lot of different dishes.

 Here is a photo of the baked tofu:


Vegan Substitutes

This morning I have been thinking about all the substitutes I use in my cooking.  Some of these things are pretty familiar to everybody but some are not.  For some people, this post might seem basic but for others that are not familiar with pure plant based food, they won't.  I avoid things like vegan sour cream, cream cheese, and other vegan cheeses.   First of all, they are processed foods and I try to avoid them if at all possible.   My objective it to eat only REAL food.   Secondly, they are expensive and almost always fat laden.   The final reason is that even vegan foods can contain ingredients with weird names that I can pronounce - I have a rule that if a product has somthing in it that I can't pronounce, I don't eat it.

I won't go so far as saying that I won't prepare things that try to mimick the flavor of something they are not; I do that alot.  I cook with no added oil with a few exceptions - I spray a baking pan with non-stick cooking spray (I'm trying to find a way around that) and I will add one type of oil in very small amounts.  Toasted sesame oil is the only type I use.   This oil gives a rich, smoky flavor to some dishes that can't be replicated.    I use a teaspoon or two of it in greens when they are cooking and put it in many Asian dishes but never more than 2 teaspoons in a dish.

Here are some of the ingredients that I use:

Toasted sesame oil (not plain - it needs to be toasted)  - Use when cooking foods that would normally have things like ham, bacon, or other type of meats cooked in with them like beans or greens.   Also great in Asian and Thai dishes.

Nutrtional Yeast - this replaces cheese and butter.   Make sure it is nutrtional yeast and not baking yeast or brewers yeast.   Many people find the smell offensive at first but after you have cooked with it a couple of times you will grow to love it.   Add 1/8 of a cup of it to your mashed potatoes after they have cooked, while you are mashing them and it gives them a rich, buttery flavor without adding fat.

Dulse or Kelp - these are sea vegetables that give a "fishy" flavor to vegan dishes that are mocking fish or seafood.   I haven't ever eaten seafood and I don't like the smell of fish but I like these seaweeds in things like mock tuna salad, vegan crab cakes, etc.

Egg Replacer - Mix equal parts of arrowroot flour and potato flour.  Add 1 tablespoons of this mixture to 2 tablespoons water and this equals 1 egg.   Use it for baking - don't try to make scrambled eggs or an omelet out of it!

Black Salt - this salt is really pink but it is called black salt.  It is readily available in most international grocery stores and is very cheap - it is used mostly in Indian cooking.  It is also called kala namak.   Use this in dishes that mimick eggs, it has a sulfuric smell very much like eggs.  Just use it instead of using regular salt in quiches, omelets, and tofu scrambles.

Silken Tofu - silken tofu is great for making sauces, alfredo, sour cream, mayo, salad dressings, and I use it to make eggs benedict and omeletes.  I will post these recipes soon.   It is low fat and very easy to work with.   Silken tofu is not usually found in the refrigerated section of the grocery store.   It is shelf stable and comes in little boxes.  Mori-Nu is the most popular brand.

Unsweetened soy milk - this is used where milk would normally be used.   There are some other vegan milks that are lower in fat but they can be tricky in some applications - I prefer to just stick with the soy milk.  To make soy milk into "buttermilk" just add a 1 tablespoon of vinegar to 1 cup of unsweetened soy milk.

Regular Tofu - Since we are on a gluten free diet we use this to replace a LOT of things.   Use to make scrambled "eggs" and use to replace beef and chicken in many recipes.  It also makes a great tofu bacon.

Liquid Smoke  - gives a realistic smoke flavor to foods, add a drop of it to sea salt to make a smoked salt, and you can use it in anything that you grill to intensify the smoky flavor.


Sunday, August 7, 2011

Buddah Bowl, Tostados with Spanish Rice, and Hippie Loaf with Sides

I started cooking again on Friday night.   We had one of our all-time favories Buddah Bowl - a classic greens, beans, rice, with tofu and a cheesy vegan sauce.   I will post the recipe for this later - I want to do a post on the proper way to prepare tofu and I will include the recipe for Buddah Bowl with that post.  I added some extra things to it that I don't usually add;  I had a lot of leftover red and orange bell peppers along with some thinly sliced zucchini from my Living Lasagna that I didn't want to waste so I added them in when I was cooking the kale.


For lunch on Saturday I made bean tostados.   I found some corn tostados at Kroger and they were really cheap.  We really liked them so I will be using them a lot more.   My husband wanted some "Cheddar Cheese" so I bought some Daiya to toss on the top.   I don't usually use the commercial vegan cheeses because they are expensive and high in fat but I got it for him.  If you like the commercial cheeses, Daiya is definitely the best choice and Kroger (at least mine) is carrying it now.


Bean Tostados with Spanish Rice

Refried Beans
1/2  onion chopped (reserve the other 1/2 for salsa)
2 cans pinto beans, drained and rinsed
2 teaspoons garlic powder
2 teaspoons ground cumin
1/2 teaspoon salt
pinch of ground cayenne pepper
1 small jalepeno pepper (optional)

Add about 1/4 cup water to a saute pan and bring to a boil.  Add the salt and onions and pan fry until onions are translucent.   Keep a small amount of water beside the pan and add little splashes as need to keep it from drying out.     While this is cooking, put the beans in a bowl and mash with a fork (or process in a food processor) until almost all the beans are smashed - it doesn't have to be a paste - you can also do this with a potato masher.  

Add beans and all remaining ingredients to the pan.   Continue cooking until heated through and smooth.   Add splashes of water as needed to keep it from drying out.  

Quick Salsa

1 can diced tomatoes with green chiles
3 tablespoons of cilantro
1/2 onion, chopped finely
1 teaspoon garlic powder
1/2 teaspoon ground cumin
Salt and pepper to taste

Mix all ingredients together and let stand a few minutes before serving.

Spread the refried beans on the tostado shells followed by some cheese if you like.   You can add black olives or anything you like.  I served it with chopped romaine lettuce and spooned some salsa over the top.

Spanish Rice

1 cup cooked brown rice
2 tablespoons taco seasoning


Add about 1/4 cup of water to the pan and add taco seasoning.   Add brown rice and cook, stirring constantly until the water is all gone.  Serve with salsa ladled over the top.

This was a very delicious lunch and I had it ready in less than 30 minutes


Hippie Loaf


This is my favorite gluten free loaf and I got the recipe from Happy Herbivore's blog here:

I served it with mashed cauliflower/potaoes with almond milk gravy and asparagus.


Quick Almond Milk

1/4 cup of almonds
1 cup water
pinch of salt

Blend together in food processor until smooth.

Mashed Cauliflower Potatoes

These are a great way to get coniferous veggies and they are delicious.

1 head of cauliflower
3 or 4 potatoes
1/8 cup of nutritional yeast
1/4 - 1/2 cup of almond milk
salt to taste

Peel the potatoes and cut the cauliflower into small pieces.   Add to pot and boil for 15-20 minutes until tender.   Drain and mash just like you normally mash potatoes until smooth.   Add in almond milk until desired consistency.   Add nutritional yeast and stir to mix in completely.  (the nutritional yeast gives it a buttery taste).

Almond Milk Gravy

1/8 cup raw almonds
1 cup water
1/2 onion, minced
2 teaspoons garlic powder
1 teaspoon poultry seasoning
2 cups vegetable broth
1/2 teaspoon thyme
1/4 teaspoon rubbed sage
1 tablespoon nutritional yeast
1 teaspoon sherry (optional)
1 tablespoon soy sauce
2 tablespoons corn starch
salt and freshly ground black pepper, to taste

In a medium-sized non-stick saucepan, saute the onion in water until translucent, about 10 minutes.  Add the vegetable broth, garlic powder, herbs, nutritional yeast, sherry, and soy sauce.  In a blender, add the almonds and water and process until smooth. Add the cornstarch and continue blending until all is smooth.  Add the almond milk mixture  to the saucepan and stir well.  Simmer, stirring occasionally, for 15 minutes, add water if needed to thin it out.  Season with salt and pepper to taste and serve.